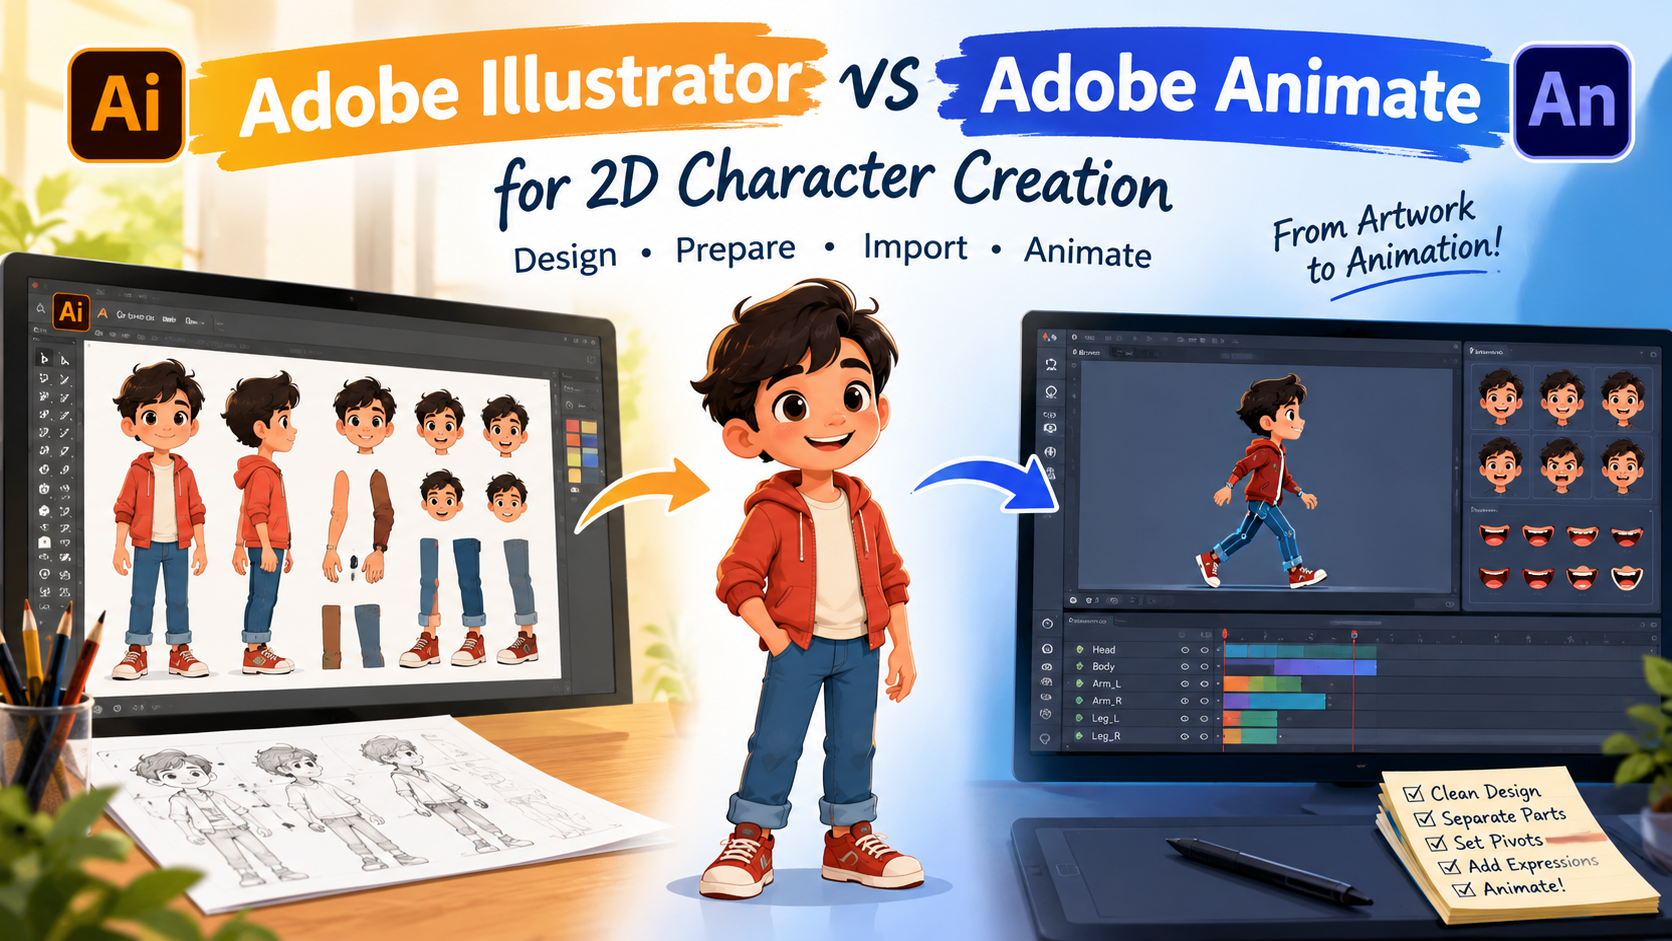
Creating a character for 2D animation is not just about drawing a good-looking face or body. The character must also be easy to edit, move, express emotions, and reuse in different scenes. This is where choosing the right software makes a real difference.
Two popular tools for this workflow are Adobe Illustrator and Adobe Animate. Although they can work together, they serve different purposes. Illustrator is primarily a vector illustration and design tool, while Animate is designed for creating 2D animations.
So, should you draw your entire character in Illustrator and then import it into Animate, or create the character directly in Animate?
Let’s compare both approaches and explore a practical workflow that can save time, simplify character preparation, and make animation easier.
1. Understanding the Difference
Adobe Illustrator: Best for Designing the Character
Illustrator is useful when you want to concentrate on the appearance of your character without worrying about animation timelines.
You can draw detailed faces, create clean outlines, design traditional Indian clothing, build accessories, experiment with colors, and refine small details. Its vector-based artwork can be resized without losing sharpness.
For example, if you are designing an Indian village character for a cartoon, you can create the head, eyes, nose, hair, moustache, kurta, dhoti, footwear, and accessories as separate objects.
You can also create multiple versions of the same character, such as different hairstyles, costumes, facial expressions, or color combinations.
The main advantage is that you can concentrate on getting the design right before moving into animation.
Adobe Animate: Best for Preparing and Animating the Character
Animate allows you to work with drawings, symbols, layers, keyframes, and a timeline. You can move a character, rotate its body parts, create facial expressions, animate mouth shapes, and build reusable animation cycles.
For example, after importing your village character from Illustrator, you can use symbols for the head, arms, hands, and legs. You can then animate a walk, a talking sequence, a waving hand, or a simple reaction.
Animate also supports drawing directly inside the application, so you do not always need Illustrator.
The important distinction is that a beautifully drawn character is not automatically an animation-ready character. The way you separate and organize its parts determines how easily you can animate it.
2. Illustrator vs Animate: A Practical Comparison
| Feature | Adobe Illustrator | Adobe Animate |
|---|---|---|
| Main purpose | Character design and illustration | 2D animation and motion |
| Drawing detailed artwork | Excellent | Good |
| Vector shapes and clean outlines | Excellent | Very useful |
| Managing complex illustrations | Strong | Better for animation-oriented assets |
| Organizing separate body parts | Excellent for artwork preparation | Excellent for timeline and symbol organization |
| Moving arms, legs and head | Not its main purpose | Yes |
| Reusable character parts | Through groups and symbols | Through symbols in the Library |
| Frame-by-frame animation | Not its main purpose | Supported |
| Talking and mouth animation | Can prepare mouth artwork | Can animate mouth changes over time |
| Walk cycles and action sequences | Limited compared with Animate | Supported |
| Best role in a combined workflow | Create and refine artwork | Animate the prepared character |
Note: Both applications have overlapping capabilities. The comparison describes their most practical roles in a typical 2D character-animation workflow.
3. Can You Create the Character in Illustrator and Import It into Animate?
Yes. This is a useful workflow, especially when you want clean, detailed characters for cartoons, explainer videos, educational content, or storytelling.
Adobe Animate can import native Illustrator .ai files and offers options to preserve artwork layers, editable paths, and supported visual effects. The exact result depends on the artwork and the import settings.
Official Adobe guide: https://helpx.adobe.com/animate/desktop/multimedia-and-video/illustrator-ai-files.html
However, there is one important point: importing a layered Illustrator file does not automatically create a fully rigged character. You still need to prepare the parts, organize them into symbols, and set up the animation.
4. How to Prepare a Character Properly in Illustrator
Imagine that you are creating a cartoon farmer who will talk, walk, raise his arms, and react to other characters.
The following preparation method makes the next stage much easier.
Step 1: Draw the complete character first
Start with a complete character design. Establish the proportions, face, hairstyle, costume, colors, and overall style.
At this stage, focus on appearance rather than movement. Check that the character looks good from the front or from whichever view your animation requires.
Step 2: Separate the body parts
Once the design is approved, divide the artwork into useful components.
A basic character may need:
- Head
- Body and torso
- Upper and lower arms
- Hands
- Upper and lower legs
- Feet
- Eyes and eyebrows
- Mouth shapes
- Hair and accessories
You do not necessarily need to separate every tiny detail. Separate only what needs to move, change, or be replaced.
For instance, if the entire sleeve should move with the arm, it may be better to include the sleeve in that arm component rather than leave it as an unrelated object.
Step 3: Plan the joints and overlapping areas
This is one of the most valuable steps in character preparation.
Suppose the farmer raises his arm. If the upper arm and forearm are drawn as two shapes that barely touch, a gap may appear when the arm rotates.
To prevent this, extend the artwork slightly underneath the adjoining part. The shoulder should be covered by the torso, and the upper arm should overlap the forearm at the elbow.
Apply the same principle to the legs, neck, hands, and feet.
Think about how the character will move before finalizing the artwork.
Step 4: Organize the layers clearly
Use meaningful layer names such as:
HeadBodyArm_Left_UpperArm_Left_LowerHand_LeftLeg_Right_UpperLeg_Right_LowerMouth_SmileMouth_Open
For a more complex character, use parent layers for major groups such as Head, Body, Arms, and Legs, with related artwork arranged beneath them.
This organization makes it easier to identify the correct artwork when importing it into Animate.
Useful tip: Keep an editable master Illustrator file. If you need to change the costume, color, or facial details later, you can return to the original artwork rather than rebuilding the character.
5. Import the Character into Adobe Animate
After preparing the Illustrator file, follow this workflow:
Step 1 — Save the Illustrator file**
Save your character as an `.ai` file. Keep the artwork in RGB color mode for a screen-based animation workflow.
Step 2 — Import the artwork
In Animate, choose File → Import → Import to Stage
Import to Library and select the Illustrator file.
Step 3 — Choose the import settings
Where appropriate, preserve the Illustrator layers as separate Animate layers and retain editable vector paths. Avoid importing the whole character as a single flattened bitmap if you need to animate individual body parts.
Step 4 — Convert parts into symbols
Select related artwork and convert it into a Graphic or Movie Clip symbol using **F8**. Give each symbol a meaningful name and an appropriate registration point.
6. Why Registration Points Matter
A registration point determines the position around which a symbol rotates or transforms.
For example, an upper arm should usually rotate around the shoulder, while a forearm should rotate around the elbow. If the registration point is positioned in the middle of the artwork instead, the arm may swing around an unnatural location.
When creating symbols, place the registration point close to the joint that will act as the pivot.
Test the rotation before building a long animation. A few seconds spent checking pivots can prevent hours of corrections later.
7. Creating Facial Expressions and Lip Sync
A character that can move its body but cannot change its expression may feel limited in a dialogue-heavy story.
For a talking character, prepare several mouth drawings in Illustrator, such as:
- Closed mouth
- Slightly open mouth
- Wide-open mouth
- Smile
- Teeth visible
- Rounded mouth for sounds such as “O”
- Other mouth shapes required by your dialogue
Place each mouth drawing on a clearly named layer or in a separate symbol. Import the artwork into Animate, then use keyframes to display the appropriate mouth shape at the right time.
You can also prepare alternative eyes and eyebrows for blinking, surprise, anger, sadness, and happiness.
For example, a farmer saying, “Look! The cow has escaped!” may need a closed mouth at the start, several changing mouth shapes during the dialogue, and wide eyes when he notices the cow running away.
Remember that a useful mouth library does not automatically produce accurate lip sync. You still need to synchronize the mouth changes with the dialogue, either manually or with an appropriate supported workflow.
8. When Should You Create the Character Directly in Animate?
Illustrator is not compulsory for every project.
Creating the character directly in Animate may be more convenient when the design is simple and the main goal is to start animating quickly.
For example, a basic cartoon with a round head, simple body, stick-like arms, and a few facial features can be drawn directly in Animate. You can immediately convert parts into symbols and test their movement.
Working directly in Animate also makes sense when the project relies heavily on frame-by-frame drawing rather than a character assembled from reusable parts.
On the other hand, if your character includes intricate traditional clothing, elaborate ornaments, detailed vector patterns, or carefully refined linework, Illustrator can provide a more comfortable environment for developing the artwork.
9. Which Workflow Saves More Time?
The answer depends on the complexity of the character and the kind of animation you intend to create.
| Project type | Practical workflow |
|---|---|
| Simple cartoon with basic shapes | Draw directly in Animate |
| Detailed character with elaborate clothing | Design in Illustrator, animate in Animate |
| Dialogue-heavy cartoon | Prepare facial and mouth variations, then animate in Animate |
| Reusable character for multiple videos | Create a well-organized Illustrator master and a reusable Animate symbol library |
| Frame-by-frame action or expressive drawing | Use Animate for the drawing and animation stages |
| Traditional Indian folk or mythology-inspired character | Design detailed artwork in Illustrator, then simplify and prepare movable parts for Animate |
| Quick educational explainer | Use whichever tool lets you produce clean, reusable assets fastest |
For recurring YouTube cartoon characters, the time-saving advantage often comes from good preparation and reuse, not simply from choosing one application over the other.
A properly organized character can be reused across multiple scenes, with new poses, expressions, dialogue, and costumes as needed.
10. Common Mistakes to Avoid
Importing the whole character as one image. This may preserve its appearance, but you will lose the flexibility of independently animating its body parts.
Separating too little. If the arm, hand, and torso are all merged into one shape, simple actions may require redrawing the artwork.
Separating too much. Every tiny decorative object does not need to become an independent symbol. Too many unnecessary components can make the timeline difficult to manage.
Ignoring overlap. Poorly prepared joints can reveal gaps when the character moves.
Using the wrong pivot points. A hand, arm, or leg can rotate unnaturally if its registration point is misplaced.
Flattening all the layers. This can make future editing and animation unnecessarily difficult.
Expecting automatic rigging after import. Illustrator supplies artwork; it does not automatically create the complete animation structure you need.
Not testing early. Before completing all the details, import a rough version and test a walk, a raised arm, a blink, and a talking mouth. Correct any problems before polishing the final character.
11. Final Thoughts
Adobe Illustrator and Adobe Animate work well together because they solve different parts of the character-production process.
Illustrator gives you room to concentrate on design, visual consistency, and detail. Animate lets you turn that artwork into movement, expressions, and reusable scenes.
If you are creating simple characters, working directly in Animate can be efficient. If you are building detailed characters that you plan to reuse across multiple videos, preparing them in Illustrator and importing them into Animate can offer a more organized workflow.
The most important lesson is simple: design for movement, not just appearance. A character with sensible layers, overlapping joints, well-placed pivots, and prepared facial expressions will generally be easier to animate than a more detailed character that has not been planned for movement.
Official References
- Adobe Help — Working with Illustrator AI files in Animate
- Adobe Help — Placing artwork into Animate
- Adobe Animate — Importing an Illustrator file: video tutorial
These resources explain the import process and artwork handling. For the best results, combine the official import guidance with the practical character-preparation steps described in this article